カスタムCellを使ったUITableView実装テンプレート
もう8月も終わりですね。夏の北アルプス登山は最高なのですが、今年はまだ行けてなくてウズウズしてます⛰
お気持ちが高まって、先週テント泊の練習に行ってきました。テント、最高です🏕
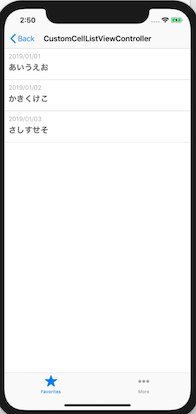
さて本題ですが、タイトル通りです。 TableViewを実装するシーンがよくあるので、コピペで使えるようにテンプレを作ってみました。 Xibで用意したカスタムCellを表示します。

ソースコードはこちら にあるので、気になった方は覗いてみてください。
実装内容を簡単に説明していきます。
UITableViewと制約追加
class CustomCellListViewController: UIViewController {
    private var sampleItems = [CustomCellItem]()
    private let tableView = UITableView(frame: .zero)

    override func viewDidLoad() {
        super.viewDidLoad()

        title = "CustomCellListViewController"

        view.addSubview(tableView)
        tableView.separatorStyle = .none
        tableView.delegate = self
        tableView.dataSource = self
        tableView.translatesAutoresizingMaskIntoConstraints = false
        tableView.topAnchor.constraint(equalTo: view.topAnchor).isActive = true
        tableView.leadingAnchor.constraint(equalTo: view.leadingAnchor).isActive = true
        tableView.trailingAnchor.constraint(equalTo: view.trailingAnchor).isActive = true
        tableView.bottomAnchor.constraint(equalTo: view.bottomAnchor).isActive = true
        tableView.register(cellType: CustomCell.self)

        sampleItems = [
            CustomCellItem(date: "2019/01/01", title: "あいうえお"),
            CustomCellItem(date: "2019/01/02", title: "かきくけこ"),
            CustomCellItem(date: "2019/01/03", title: "さしすせそ")
        ]
    }
}
私は基本的に、UITableViewのframe をCGRect.zeroで初期化して、左右上下の制約を親のViewに合わせる形で実装しています。
そして セルの登録 tableView.register(cellType: CustomCell.self) ですが、Extensionを書いて記述量を少なくしています。
public func register(cellType: UITableViewCell.Type, bundle: Bundle? = nil) {
    let className = String(describing: cellType)
    let nib = UINib(nibName: className, bundle: bundle)
    register(nib, forCellReuseIdentifier: className)
}
こうしておくと、楽チンで良いですよ〜〜
カスタムCellの実装
カスタムCellは、Xibを利用して実装しています。

Xibの Custom Class に紐付けるClass(今回は CustomCell)を指定したのちに、ラベルなどの各コンポーネントをCustomCellクラスに紐付けていきます。
UITableViewDataSource, UITableViewDelegateに準拠する
Protocolに準拠する場合、私はよく、見通しをよくするために 対象ViewControllerのextension に書くようにしています。
extension CustomCellListViewController: UITableViewDataSource {
    func tableView(_ tableView: UITableView, numberOfRowsInSection section: Int) -> Int {
        return sampleItems.count
    }

    func tableView(_ tableView: UITableView, cellForRowAt indexPath: IndexPath) -> UITableViewCell {
        let item = sampleItems[indexPath.row]
        let cell = tableView.dequeueReusableCell(with: CustomCell.self, for: indexPath)
        cell.update(item: item)
        return cell
    }
}
ここの dequeueReusableCell(with: CustomCell.self, for: indexPath) も、UITableViewのExtensionを書いて記述量を少なくしています。
public func dequeueReusableCell<T: UITableViewCell>(with type: T.Type,
                                                    for indexPath: IndexPath) -> T {
    let className = String(describing: type)
    let cell = dequeueReusableCell(withIdentifier: className, for: indexPath) as? T
    guard let dequeueCell = cell else {
        fatalError("Could not dequeue a cell of class \(className)")
    }
    return dequeueCell
}
そして、UITableViewDelegateはこんな感じ。
extension CustomCellListViewController: UITableViewDelegate {
    func tableView(_ tableView: UITableView, didSelectRowAt indexPath: IndexPath) {
        let viewController = UIViewController()
        viewController.view.backgroundColor = .white
        navigationController?.pushViewController(viewController, animated: true)
        tableView.deselectRow(at: indexPath, animated: true)
    }
}
セルをタップした際は、次の画面に遷移するようにします。
戻ってきたときに、セルがグレー(選択状態)になってしまうのが格好悪いので tableView.deselectRow(at: indexPath, animated: true) で選択状態を解除します。
以上、わたしのUITableView実装テンプレートの説明でした。 こういった、自分なりのテンプレートを用意しておくと、新しい画面の実装スピードも早くなって、良いですね〜🤸🏼♂️✨
ではでは、残りの夏も楽しみましょ〜🍧
ウー早く北アルプス行きたい...!!⛰⛰