UIProgressViewを使ってインスタのストーリーみたいなUIを作ってみる
こんにちは。
今日は山の日⛰ですが、天気が悪くて予定していた山登りを断念しました。台風〜〜〜😭🌪!!
今回はインスタグラムのストーリーのようなUIを作ってみたので実装方法のご紹介です。
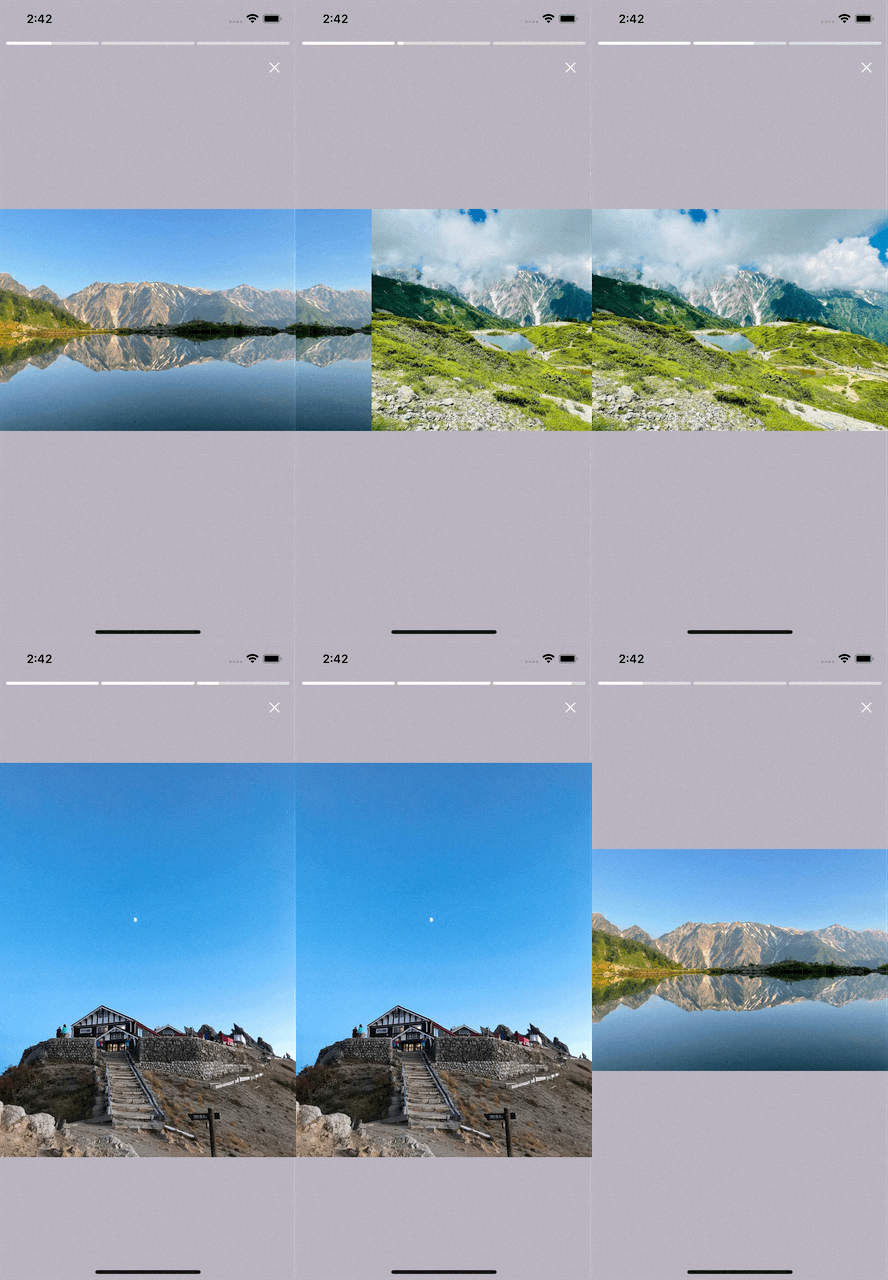
以下のような画面で、画面表示とともにプログレスバーがアニメーションを開始し、アニメーションが完了したら次の画像を表示します。
ユーザーが左右にスワイプした時には、表示されている画像と同じ位置のプログレスバーがアニメーションを開始します。

実装方針を簡単に説明すると、
- UIScrollViewの上に画像を表示して左右にスクロールできるようにする
- UIProgressViewで実装したプログレスバーの進行状態をタイマー(CADisplayLink)を使って更新し、アニメーションしているように見せる
- ユーザーが画面をスクロールしたり、プログレスバーのアニメーションが完了したら、画像・プログレスバーの位置を切り替える
といった内容になります。以下で詳しく説明します。
いつもの通りコードはこちらにあげています。
画面(ProgressBarViewController.swift)の実装
UIの実装
- UIScrollViewをviewに追加して画面いっぱいに表示する
- 表示したい画像の分だけUIImageViewを生成・追加し、画像の数に応じてcontentSizeを変える
- UIScrollViewのisPagingEnabledをtrueにすることで適切な位置でスクロールビューが止まるようにする
override func viewDidLoad() {
    super.viewDidLoad()
    {..省略..}
    containerScrollView.isPagingEnabled = true
    containerScrollView.showsVerticalScrollIndicator = false
    containerScrollView.showsHorizontalScrollIndicator = false
    containerScrollView.delegate = self
    view.addSubview(containerScrollView)
    containerScrollView.translatesAutoresizingMaskIntoConstraints = false
    NSLayoutConstraint.activate([
        containerScrollView.leadingAnchor.constraint(equalTo: view.leadingAnchor),
        containerScrollView.topAnchor.constraint(equalTo: view.topAnchor),
        containerScrollView.trailingAnchor.constraint(equalTo: view.trailingAnchor),
        containerScrollView.bottomAnchor.constraint(equalTo: view.bottomAnchor)
    ])
    {..省略..}
}

override func viewDidLayoutSubviews() {
    super.viewDidLayoutSubviews()
    containerScrollView.contentSize = CGSize(width: view.bounds.width * CGFloat(imageIDs.count), height: view.bounds.height)
    for (i, imageView) in imageViews.enumerated() {
        let frame = CGRect(x: CGFloat(i) * view.bounds.width, y: 0, width: view.bounds.width, height: view.bounds.height)
        imageView.frame = frame
    }
    scrollContentToCurrentIndex()
    runAnimationOfCurrentIndex()
}
imageIDs.enumerated().forEach { index, id in
    let imageView = UIImageView(frame: .init(x: 0, y: 0, width: 300, height: 200))
    containerScrollView.addSubview(imageView)
    imageView.image = UIImage(named: "\(id).jpg")
    imageView.contentMode = .scaleAspectFit
    imageView.clipsToBounds = true
    imageViews.append(imageView)
    let progressBar = ProgressBar(with: index)
    progressBar.delegate = self
    progressBarStackView.addArrangedSubview(progressBar)
}
ユーザーアクションやアニメーション終了時の動作
- 左右にスクロールした場合
extension ProgressBarViewController: UIScrollViewDelegate {
    func scrollViewDidEndDecelerating(_ scrollView: UIScrollView) {
        let currentPageIndex = Int((scrollView.contentOffset.x + (0.5 * scrollView.bounds.width)) / scrollView.bounds.width)
        if currentPageIndex == currentIndex { return }

        let isMovingRight = scrollView.panGestureRecognizer.translation(in: scrollView.superview).x < 0
        if isMovingRight {
            if currentIndex == (imageIDs.count - 1) {
                return
            } else {
                currentIndex = currentPageIndex
            }
        } else {
            if currentIndex == 0 {
                currentIndex = 0
            } else {
                currentIndex = currentPageIndex
            }
        }
        progressBarStackView.arrangedSubviews.enumerated().forEach { index, subview in
            if let bar = subview as? ProgressBar {
                bar.pauseAnimation()
                bar.reset()
                if index < currentIndex {
                    bar.fill()
                }
            }
        }
        runAnimationOfCurrentIndex()
    }
}
- プログレスバーのアニメーションが終了した場合
- 表示する画像の位置を更新して、アニメーションをリセットしたりscrollViewを適切な位置に移動する
extension ProgressBarViewController: ProgressBarDelegate {
    func didCompleteAnimation(index: Int) {
        if index < (imageIDs.count - 1) {
            currentIndex = index + 1
        } else {
            progressBarStackView.arrangedSubviews.forEach { subview in
                if let bar = subview as? ProgressBar {
                    bar.reset()
                }
            }
            currentIndex = 0
        }
        runAnimationOfCurrentIndex()
        scrollContentToCurrentIndex()
    }
}
プログレスバー(ProgressBar.swift)の実装
- UIProgressViewでプログレスバーを実装する
- CADisplayLinkという実行タイミングが画面のリフレッシュレートと同期するタイマーオブジェクトを使って、プログレスバーの表示を更新する
- displayLinkから前回リフレッシュした日時が取得できるので、その差分から位置を割り出して決定する
override func willMove(toWindow newWindow: UIWindow?) {
    super.willMove(toWindow: newWindow)
    displayLink?.invalidate()
    displayLink = nil
    if newWindow != nil {
        let displayLink = CADisplayLink(target: self, selector: #selector(update))
        displayLink.add(to: .main, forMode: .common)
        self.displayLink = displayLink
    }
}


@objc private func update(_ displayLink: CADisplayLink) {
    if isPaused { return }
    if let lastTimeStamp = lastTimeStamp {
        currentTime += displayLink.timestamp - lastTimeStamp
    } else {
        currentTime = 0.0
    }
    lastTimeStamp = displayLink.timestamp
    progressView.progress = min(max(0.0, Float(currentTime / duration)), 1.0)

    if progressView.progress >= 1.0 {
        delegate?.didCompleteAnimation(index: index)
        isPaused = true
    }
}
さいごに
UIScrollViewの上に画像を表示し、CADisplayLinkとUIProgressViewを使ってプログレスバーのアニメーションを実現してみました。
ストーリーのように画面タップでアニメーションを止めたり、左右タップで画像を切り替えるような実装は入れていませんが、
今回の実装にはアニメーションの停止や画像の切り替えの処理も含んでいるので、それらの機能を追加することは難しくないかなと思います。
半分自分の備忘録として書いていますが、どなたかの参考になればうれしいです📝(Core Animationを使うなど、もっと良い実装方法もありそうですが💭💭)
ではでは〜〜👋